With time passing like cars on a freeway, we had to get to work fast! I set out after our first meeting with The Mill to get the car model, take the HDRI’s for the light rigs, and rig the car for animation! All in all I stayed busy.

The Model we chose was a newer model Range Rover Evoque purchased from online ready to go! It has all the bells and whistles, minus it being UVed it’s just what we needed. Once opening the file sent to us I quickly found out however, nothing was named at all. Therefore I carefully took two hours to label each part, only to have the save not work and fail to re-open. So after a short…let’s say cool down, I set off again. This time saving as I went.
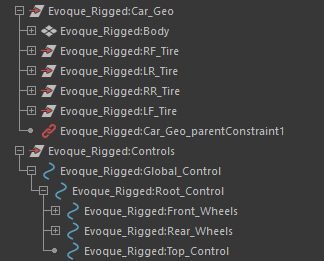
Next, my sights were set on getting the car rigged. This was something I have never touched before, but a few tutorials later I was a rigging pro, at least for cars. The car rig is nothing special. A NURBS curve acts as the controls for the objects I defined by groups. There are controls for the individual front tires, then the set of them, the rear tires, and the set. The top control allows the animator to control the body roll, and the control around the middle of the body, the root control, allows the animator to move the car front or back and the wheels will roll with the car the correct amount. Then just a world control at the bottom so it can be easily placed in the scene.
With our plan to do something on a beach at golden hour I drove out to Tybee Island at sunset to take some 360 degree photos with a classmate. We took the photos with an 8mm lens spinning the camera about 4 times taking 5 different exposures. After I got back I threw the photos into PTGui to stitch them together. Giving me my lovely HDRI’s


It’s only week one of production and things are starting to get busy. I can’t wait to see what the rest of the time will hold!